Building Your Own DIY Off Grid Water Filtration System
So, you’re thinking about going off-grid with your water, huh? That’s a big step, but totally doable. This article is all about building your own DIY off grid water filtration system. We’ll walk through everything from finding good water to making sure it’s safe to drink. It’s not as hard as you might think, and it gives you a lot of independence. Let’s get started and make sure you’ve got clean water, no matter what.
Key Takeaways
- Always check your water source first to avoid major problems later on.
- Layering different filter materials is key for cleaning water effectively.
- A vortex clarifier helps get rid of big stuff before the main filtering.
- UV light or activated carbon can make your water even safer to drink.
- Regular checks and cleaning keep your filtration system working well for a long time.
Understanding Off Grid Water Sources
When you’re living off the grid, water isn’t just a convenience; it’s a necessity. Unlike city dwellers who can turn on the tap without a second thought, we have to be smart about where our water comes from and how we treat it. It’s a whole different ballgame, but with a little planning, you can secure a reliable and safe water supply.
Identifying Safe Water Collection Points
Finding a good water source is the first step. Look for springs, streams, or even rainwater as potential options. But not all water sources are created equal. You need to consider factors like:
- Proximity to potential contamination sources (farms, septic systems, roads).
- The watershed area – a larger watershed can mean more runoff and potential pollutants.
- Accessibility – can you easily get to the water source year-round?
Choosing the right spot can save you a lot of headaches down the road. Think about how the surrounding land is used and what could potentially end up in your water supply. It’s better to be overly cautious than to risk your health.
Assessing Water Quality Before Filtration
Before you even think about drinking it, you need to get a sense of what’s in your water. Visual inspection is a start – is it clear, or is it murky? Does it have an odor? But that’s not enough. You’ll want to test for things like:
- pH levels
- Bacteria (E. coli, coliform)
- Nitrates/nitrites
- Total Dissolved Solids (TDS)
You can buy water testing kits online or at hardware stores, or you can send samples to a lab for more detailed analysis. Knowing what you’re dealing with will help you choose the right filtration methods.
Minimizing Contamination at the Source
Prevention is always better than cure. There are things you can do to protect your water source from contamination. For example:
- Divert runoff away from your collection point.
- Create a buffer zone of native vegetation around the source.
- If using a stream, collect water as far upstream as possible.
By taking these steps, you can reduce the amount of work your filtration system has to do and ensure a cleaner, safer water supply. It’s all about working with nature, not against it.
Essential Components for DIY Off Grid Water Filtration
Building a DIY off-grid water filtration system means carefully choosing the right components. It’s not just about slapping some stuff together; it’s about creating a system that actually works and gives you safe drinking water. Let’s break down the key parts you’ll need.
Selecting the Right Filtration Media
Choosing the filtration media is super important. This is what actually cleans the water. You’ve got a few options, and each does something different. Sand filters are great for getting rid of bigger particles. Activated carbon is awesome for taking out chemicals and bad tastes. And then there are specialized filters for things like heavy metals. The key is to layer these in your filter for the best results.
Here’s a quick rundown:
- Sand: Removes sediment and debris.
- Gravel: Supports the sand layer and provides initial filtration.
- Activated Carbon: Absorbs chemicals, chlorine, and odors.
- Ceramic Filters: Removes bacteria and protozoa.
Choosing Durable Containers for Your System
Your filtration system needs to be housed in something, right? You’ll want to pick containers that are tough and won’t leach anything nasty into your water. Food-grade plastic barrels are a popular choice. They’re sturdy, easy to find, and won’t break the bank. Just make sure they’re actually food-grade! You don’t want to filter your water only to have it contaminated by the container itself. Think about how big you want your system to be and how much water you need to filter. This will help you decide on the right size barrels. You can also use stainless steel, but that’s usually more expensive. Consider the benefits of whole-home filtration for a comprehensive approach to water purification.
Integrating Pre-Filtration Stages
Before your water hits the main filter, it’s a good idea to have some pre-filtration stages. This helps to remove larger particles and sediment, which can clog up your main filter and make it less effective. A simple screen or cloth filter can do wonders for catching leaves and twigs. A vortex clarifier is another great option for settling out heavier particles before they even reach your filter barrel. Pre-filtration not only extends the life of your main filter but also improves the overall quality of your filtered water. It’s like giving your filter a head start, so it doesn’t have to work as hard.
Pre-filtration is a game-changer. It’s like giving your main filter a break, so it can focus on the really small stuff. Plus, it means you won’t have to clean or replace your main filter as often, which saves you time and money in the long run.
Building a Vortex Clarifier for Initial Treatment

Gathering Materials for Your Clarifier
Okay, so you want to build a vortex clarifier? First, you’ll need to gather your supplies. This is where the DIY part really kicks in. You can often find a lot of this stuff used, which saves money and is better for the environment. Here’s a basic list to get you started:
- A large container: A 55-gallon drum works great. Check local reclaim centers or Craigslist.
- Two Banjo bulkheads (1.5-inch). These will connect your inlet and outlet pipes.
- PVC pipes and fittings: Get enough to connect your water source to the clarifier and then from the clarifier to your next filtration stage. Measure twice, cut once!
- PVC cement: For gluing those PVC connections together.
- A drill with hole saw attachments: To make the holes for the bulkheads.
- Some concrete blocks: To elevate the clarifier for gravity flow (optional, but recommended).
Assembling the Vortex Clarifier Unit
Alright, time to put it all together. This is where you’ll transform those parts into a functional clarifier.
- Cut the Inlet Hole: Drill a hole near the top of the drum, offset to the side. This offset is what creates the vortex action.
- Cut the Outlet Hole: Drill another hole on the opposite side, near the bottom of the drum. This allows the clarified water to exit.
- Install the Bulkheads: Use the hole saw to create appropriately sized holes for the bulkheads. Insert and seal them tightly. Make sure they’re watertight!
- Connect the Piping: Attach the PVC pipes and fittings to the bulkheads. Use PVC cement to ensure a strong, leak-proof connection.
- Elevate the Clarifier: If you’re using concrete blocks, position them to create a stable base for the drum. This allows gravity to assist with water flow.
Optimizing Flow for Sediment Removal
Getting the flow right is key to making your vortex clarifier work efficiently. You want the water to swirl just right, allowing sediment to settle out. Here’s how to dial it in:
- Adjust the Inlet Flow: Start with a slow flow rate and gradually increase it. Watch how the water swirls inside the clarifier. You want a gentle vortex, not a turbulent mess.
- Monitor Sediment Accumulation: Check the bottom of the clarifier regularly to see how much sediment is collecting. If it’s filling up too quickly, you might need to reduce the flow rate.
- Regular Cleaning: Plan to drain and clean out the accumulated sediment periodically. How often depends on the water source, but a monthly cleaning is a good starting point.
A well-tuned vortex clarifier can significantly reduce the amount of sediment that reaches your downstream filters, extending their lifespan and improving overall water quality. It’s a simple but effective way to pre-treat your water before it goes through more advanced filtration stages.
Constructing a DIY Filter Barrel
Sourcing Components for Your Filter Barrel
Okay, so you’re ready to build your own filter barrel? Awesome! First things first, you gotta gather all the stuff you’ll need. I usually start by hitting up local places to save some cash. Finding a good, clean barrel is key.
Here’s a list to get you started:
- A 55-gallon plastic drum (food-grade is best!). Check Craigslist or local recycling centers.
- Various sizes of PVC pipes and fittings for inlet and outlet. Don’t forget the PVC cement!
- A Banjo 2" bulkhead fitting for the drain. Amazon is your friend here.
- Gravel, sand (different grades), and activated carbon for the filter layers. Pool supply stores often have the best prices on sand.
- Weed barrier fabric to separate the layers. This stuff is cheap and keeps everything from mixing together.
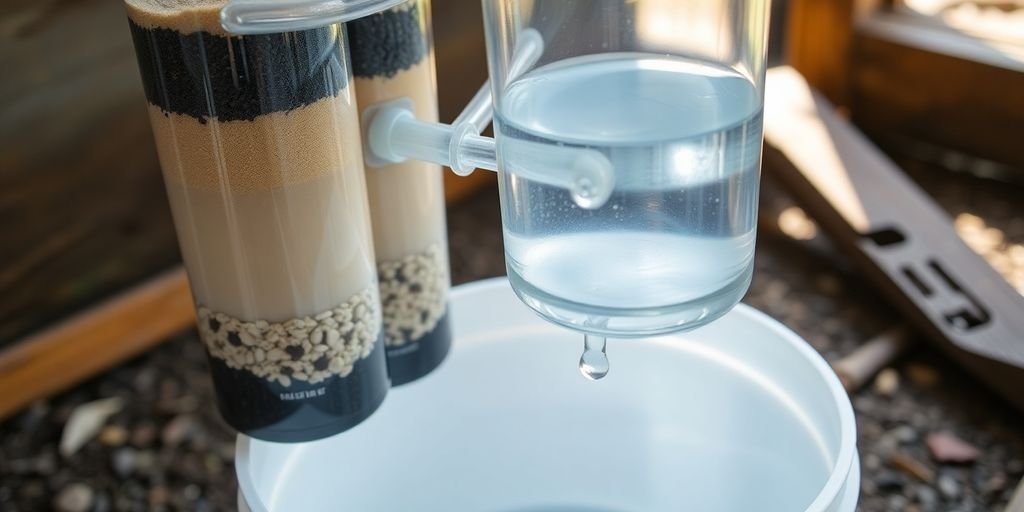
Layering Filtration Materials Effectively
Alright, you’ve got all your parts. Now comes the fun part: layering the filtration media. This is where the magic happens! The order and thickness of the layers are super important for getting clean water. I like to think of it as building a lasagna, but instead of delicious food, you get potable water. Here’s how I usually do it:
- Bottom Layer: A thick layer of coarse gravel (around 10 inches) for drainage. This prevents the finer layers from clogging up the outlet.
- Middle Layers: Progressively finer gravel and sand. Start with a medium gravel (5 inches), then a fine gravel (5 inches), and finally a layer of pool filter sand (15 inches). Each layer filters out smaller particles.
- Top Layer: A layer of activated carbon (5-6 inches) to remove chemicals and improve taste. Make sure to rinse the carbon before adding it to the barrel!
Don’t forget to put weed barrier fabric between each layer to keep them separate. This makes maintenance way easier down the road.
Maintaining Your Filter Barrel for Longevity
So, you’ve built your filter barrel, and it’s pumping out clean water. Great! But don’t just set it and forget it. Maintenance is key to keeping your system running smoothly for years to come. Here’s what I do:
- Regular Backflushing: Every few months, backflush the barrel to remove accumulated sediment. Just run water backward through the system until it runs clear.
- Media Replacement: The sand and gravel will eventually get clogged and need replacing. I usually replace the top layer of sand every year or two, and the gravel every 3-5 years.
- Activated Carbon: Replace the activated carbon more frequently, like every 6-12 months, depending on water quality.
- Inspect Regularly: Check the barrel and plumbing for leaks or damage. Fix any issues promptly to prevent bigger problems.
Keeping your filter barrel clean and well-maintained will not only ensure a consistent supply of clean water but also extend the life of your entire system. It’s a bit of work, but totally worth it for the peace of mind.
Advanced Filtration Techniques for Potable Water

So, you’ve got your basic filtration going, but what if you want really clean water? Like, potable-water-for-drinking clean? That’s where advanced techniques come in. It’s not always a walk in the park, but the peace of mind is worth it. Let’s explore some options.
Implementing Activated Carbon for Purity
Activated carbon is a game-changer. It’s fantastic at removing chlorine, volatile organic compounds (VOCs), and other impurities that affect taste and odor. Think of it as a sponge that soaks up all the bad stuff. You can get activated carbon filters in various forms, like granular activated carbon (GAC) or carbon block filters. GAC is cheaper, but carbon block filters tend to be more effective at removing smaller particles. I’ve found that replacing the carbon regularly is key to maintaining its effectiveness. It’s like changing the oil in your car – you gotta do it to keep things running smoothly. You can buy activated carbon filters online.
Considering UV Sterilization for Pathogens
UV sterilization is another level of defense. It uses ultraviolet light to kill bacteria, viruses, and other pathogens in the water. It doesn’t remove sediment or chemicals, so it’s best used after other filtration methods. Here’s the deal:
- It’s effective against a wide range of pathogens.
- It doesn’t add any chemicals to the water.
- It requires electricity to operate (something to consider for off-grid setups).
I remember when my friend installed a UV sterilizer in his off-grid cabin. He said it was the best investment he ever made. No more worrying about giardia or other nasty bugs in the water. It’s a great way to ensure your water is safe to drink.
Exploring Reverse Osmosis for Comprehensive Treatment
Reverse osmosis (RO) is the big kahuna of water filtration. It uses pressure to force water through a semi-permeable membrane, removing almost everything – minerals, salts, chemicals, and microorganisms. It’s like hitting the reset button on your water. RO systems are more complex and expensive than other filtration methods, and they also produce wastewater. But if you want the purest water possible, RO is the way to go. You can check out RO systems online. Here’s a quick comparison:
| Feature | Activated Carbon | UV Sterilization | Reverse Osmosis |
|---|---|---|---|
| Removes Chemicals | Yes | No | Yes |
| Kills Pathogens | No | Yes | Yes |
| Complexity | Low | Medium | High |
| Cost | Low | Medium | High |
Choosing the right advanced filtration technique depends on your specific needs and water source. Consider what contaminants you’re dealing with and how much effort you’re willing to put into maintaining the system. With a little research and planning, you can enjoy clean, safe drinking water no matter where you are.
Testing and Maintaining Your DIY Off Grid Water Filtration System
It’s easy to think the hard work is over once your filtration system is up and running, but regular testing and maintenance are super important. Neglecting these steps can lead to system failure or, worse, contaminated water. Let’s look at how to keep your system in tip-top shape.
Regular Water Quality Testing Protocols
Regular testing is the only way to know if your system is working. You can’t just assume the water is safe because it looks clear. Here’s what you should do:
- Initial Testing: Right after you set up your system, get a comprehensive water test done by a certified lab. This gives you a baseline to compare future results against.
- Routine Testing: Invest in a home water testing kit for regular checks. These kits usually test for things like pH, chlorine, nitrates, and bacteria. Follow the kit’s instructions carefully.
- Periodic Lab Tests: Even with home kits, send samples to a lab at least once or twice a year. Labs can detect a wider range of contaminants that home kits might miss. Consider using handy water test kits for initial assessments.
- Keep Records: Maintain a log of all your test results. This helps you spot trends and identify potential problems early.
Routine Cleaning and Replacement of Components
Like any machine, your filtration system needs regular cleaning and parts replacement. Here’s a basic schedule:
- Pre-filters: Clean or replace pre-filters (like sediment filters) every 1-3 months, depending on how dirty they get. Clogged pre-filters reduce the flow rate and put extra strain on the other filters.
- Filter Media: Replace the filter media (sand, gravel, activated carbon) according to the manufacturer’s recommendations or when you notice a decrease in water quality. Activated carbon usually needs replacing every 6-12 months.
- Containers: Clean the inside of your filter containers every few months to prevent algae growth and buildup of sediment. Use a brush and some soapy water, but rinse thoroughly to remove all soap residue.
- Pipes and Fittings: Inspect pipes and fittings for leaks or cracks regularly. Replace any damaged parts immediately.
Troubleshooting Common Filtration Issues
Even with the best maintenance, problems can still arise. Here are some common issues and how to fix them:
- Slow Flow Rate: This is often caused by clogged filters. Try cleaning or replacing the pre-filter first. If that doesn’t work, replace the main filter media.
- Cloudy Water: This could indicate that the filters aren’t working properly or that there’s a new source of contamination. Check the filters and test the water.
- Bad Taste or Odor: This is usually caused by organic matter or chlorine. Replace the activated carbon filter. If the problem persists, consider UV sterilization.
- Algae Growth: Algae can grow in the containers, especially if they’re exposed to sunlight. Clean the containers and consider moving the system to a shaded area.
Remember, your DIY filtration system is only as good as the effort you put into maintaining it. Regular testing, cleaning, and troubleshooting will ensure that you have a reliable source of clean water for years to come.
Integrating Your Filtration System with Rainwater Harvesting
Rainwater harvesting is a fantastic way to supplement or even replace your reliance on other water sources. When combined with a DIY filtration system, you can create a truly sustainable and independent water supply. It’s not just about catching rain; it’s about creating a system that provides clean, usable water year-round. Let’s explore how to make it happen.
Designing a Rainwater Collection System
First things first, you need to figure out how to collect the rainwater. This usually involves your roof, gutters, and some kind of storage container. The size of your roof and the amount of rainfall you get will determine how much water you can collect. Here are some things to consider:
- Roof Material: Some roofing materials are better than others for rainwater harvesting. Avoid roofs with lead or asbestos. Metal roofs are generally a good choice.
- Gutter System: Make sure your gutters are clean and in good repair. You might want to install gutter guards to keep out leaves and debris. This will reduce the amount of pre-filtration needed.
- First Flush Diverter: This is a simple device that diverts the first bit of rainwater away from your storage tank. This first flush usually contains the most contaminants from your roof. You can even build a DIYBMP to help with this.
- Storage Tank: Choose a storage tank that’s appropriate for your needs. Consider the size, material, and location of the tank. Dark-colored, opaque tanks are best to prevent algae growth.
Connecting Filtration to Rainwater Storage
Once you have your rainwater collection system set up, you need to connect it to your filtration system. This is where things can get a little tricky, but with careful planning, it’s totally doable. Here’s the general idea:
- Pre-filtration: Before the rainwater enters your main storage tank, it’s a good idea to have some kind of pre-filtration in place. This could be as simple as a screen to remove large debris, or a vortex clarifier to settle out sediment.
- Storage Tank Connection: Connect the outlet of your pre-filtration system to the inlet of your storage tank. Make sure the connection is watertight to prevent contamination.
- Filtration System Connection: Connect the outlet of your storage tank to the inlet of your DIY filtration system. You might need a pump to provide enough pressure for the filtration system to work effectively.
- Post-filtration Storage: After the water has been filtered, you’ll need a clean storage container to store the filtered water. This could be another tank, or a series of smaller containers.
It’s important to remember that rainwater harvesting is not a substitute for a reliable water source. It’s a supplement. You should always have a backup plan in case of drought or other emergencies.
Ensuring Year-Round Water Availability
One of the biggest challenges with rainwater harvesting is ensuring that you have enough water to last throughout the year, especially during dry periods. Here are some strategies to help you achieve year-round water availability:
- Accurate Rainfall Data: Keep track of how much rain you’re actually getting. This will help you estimate how much water you can collect and how much storage capacity you need. You can find rainfall data online or use a rain gauge.
- Maximize Storage Capacity: The more storage capacity you have, the better. Consider adding additional storage tanks if you have the space and budget.
- Water Conservation: Be mindful of how much water you’re using. Implement water-saving measures in your home and garden to reduce your overall water consumption.
- Alternative Water Sources: Have a backup plan in place in case your rainwater supply runs low. This could be a well, a spring, or a connection to the municipal water supply.
- Automated System: Consider automating your rainwater harvesting system with sensors and controls. This can help you optimize water collection and storage, and ensure that you always have a reliable supply of clean water. Automating off-grid water systems can be a game changer.
Wrapping Things Up
So, there you have it. Building your own off-grid water filter might seem like a big job, but it’s totally doable. It’s not just about having clean water when things go sideways; it’s also about feeling good knowing you can take care of yourself and your family. Plus, it’s pretty cool to say you built something so important with your own hands. Just remember to keep things simple, test your water, and don’t be afraid to try. You’ll be surprised what you can do.
Frequently Asked Questions
How do I pick a good spot to get water from?
It’s super important to know where your water comes from. Look for places where the water is already pretty clean, like from a fresh spring or rainwater collected from a clean roof. Try to avoid water that looks dirty or has weird smells.
Should I check the water before I filter it?
Before you even start filtering, check your water. Does it look muddy? Are there leaves or bugs in it? The cleaner it is to begin with, the easier your filter will work. You can also get simple test kits to check for bad stuff you can’t see.
What’s a vortex clarifier and why do I need one?
A vortex clarifier helps get rid of bigger pieces of dirt and gunk before the water goes into your main filter. It spins the water around, making the heavy stuff fall to the bottom. This makes your main filter last longer and work better.
How does a DIY filter barrel work?
A filter barrel is like a big container filled with layers of different materials, like sand, gravel, and charcoal. As water slowly goes through these layers, the tiny bits of dirt and other impurities get trapped, making the water cleaner.
What are activated carbon and UV sterilization for?
Activated carbon is great for taking out bad tastes, smells, and some chemicals from your water. UV sterilization uses special light to kill germs like bacteria and viruses. These steps make your water even safer to drink.
How often should I check and clean my water filter system?
You should test your water regularly, especially after you’ve built your system, to make sure it’s working well. Also, clean or replace your filter materials when they get dirty or stop working as well. If your water still looks or tastes off, check all parts of your system for problems.